Post Bound Scrapbook DIY: printing on post bound pages
Are you in the process of putting together a post bound scrapbook? I love the idea of using our Post-Bound Photo Album for a project like that. It's not only very customizable, but the vertical format makes it really easy to just print directly onto the pages.
A year ago, I started photographing daily life in the new home we purchased. This was our first home buy, and I really wanted to record daily life starting at year one of owning it.
For the first page, I pulled our family Christmas photo along with a few favorite instagram shots and arranged them on a photoshop document.
Another way I documented our first year in the new house was through blogging. I pulled this photograph and my blog entry into photoshop to capture my feelings on being a first time homeowner and wife to a graduate student.
Once I figured out what I wanted to include in my post-bound album, I pulled up my trusty photoshop program, and got to work. Below, you'll see how I set up a document for designing, and how I print the front and back of the pages using a front-loading printer.
That's it! Please share your questions, feedback, or even post bound page examples in the comments below. I can't WAIT to see what you all do with your post bound albums!

A year ago, I started photographing daily life in the new home we purchased. This was our first home buy, and I really wanted to record daily life starting at year one of owning it.
For the first page, I pulled our family Christmas photo along with a few favorite instagram shots and arranged them on a photoshop document.

Another way I documented our first year in the new house was through blogging. I pulled this photograph and my blog entry into photoshop to capture my feelings on being a first time homeowner and wife to a graduate student.

Once I figured out what I wanted to include in my post-bound album, I pulled up my trusty photoshop program, and got to work. Below, you'll see how I set up a document for designing, and how I print the front and back of the pages using a front-loading printer.
Formatting a Document for your Post Bound Scrapbook In Photoshop
- To format a document for our paper in Photoshop, go to File >> New... and select U.S. Paper from the Preset drop down menu.

- Once your document is created, go up to the top and select View >> New Guide... and select vertical.

- If printing for the front of your paper, type 1.5 in the "position" text box. Click Ok.
- You'll now see a blue line to the left of your document. This is a guide that will not print on your final page. It's there to show you that the area to the right of line is safe to design on and will not be hidden once you put your pages into the scrapbook.


- If printing for the back of your paper, type 7.5 in in the "position" text box. Click Ok.

- Once you've completed your design, save your document as a psd (in case you need to make changes later or want to use it as a template), and save it as a pdf for printing purposes.
Printing at Home for Your Post Bound Scrapbook
- Before you begin, make sure you know how to load paper into your printer when there's a designated front and/or back to your paper. On our post bound pages, the crease raises up slightly on the back. Practice loading your printer and printing on a scrap piece of paper if you aren't sure.

- We have a front loading printer at the Blue Sky Papers studio, so in order for us to print on the front side of our post bound pages, we have to load the paper upside down and backwards with the holes on the right side:

- Once you've loaded your paper, open up your pdf in a program that will allow you to access your printer options. Photoshop, Adobe Reader, and a few others allow you to do this, but for ease and familiarity, we chose Adobe Reader.
- Once you've gone to File >> Print... in Adobe Reader, make sure the preview image looks right. We selected "Fit" under "size options"
- Double check your orientation and then select "page setup..."
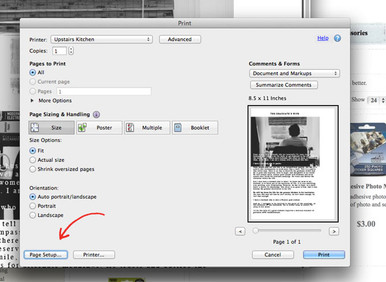
- this step is important, especially if you have more than one printer set up on your computer. Under "Format For" select the correct printer from the drop down. Click Ok.

- Once back on the initial screen, click on "printer..."
- Select "media & quality" from the drop down menu. If you've properly installed your printer, you should have some paper types to choose from under "media type." We chose "photo"
- The quality slider is up to you. We chose "best."

- Click print and print your page!

- With the front loading printer, you'll see your final printed page will come out correctly, with the crease facing inward.

- To print on the back of the page, you'll need to reverse feed your paper through the printer. So, you'll put the printed page back in the printer with the images facing up.
That's it! Please share your questions, feedback, or even post bound page examples in the comments below. I can't WAIT to see what you all do with your post bound albums!
Sep 24th 2014